Setting up Slack SAML SSO with Keycloak
Hey there, if you’re reading this you’re probably a Slack Admin that also has a Keycloak SSO environment, and you want to know how to connect A and B. Well, luckily it is possible, but not 100% apparent how to get it working out of the box. Slack does a pretty excellent job of telling you what you need to do, but this is a step by step guide of how to get Keycloak working as a SSO source for Slack.
There are a couple prerequisites you will need to have in place before continuing.
- A Slack Account that is a part of the Slack Plus pricing level.
- A Keycloak Environment with proper TLS certificates trusted by a web browswer. A private CA will probably not work here.
- You need to be a Slack Admin or Owner, and you need to have permissions to make a “client” in Keycloak.
There are also some other resources you will want to keep nearby, namely:
https://get.slack.help/hc/en-us/articles/205168057-Custom-SAML-single-sign-on
https://get.slack.help/hc/en-us/articles/220403548-Guide-to-single-sign-on-settings
Update 7/30/2020 - The place to get the metadata document changed, see updated notes below.
Setting up the Keycloak Client
Login to the Keycloak admin interface, this is normally at https://[kc-url]/auth/admin/master/console
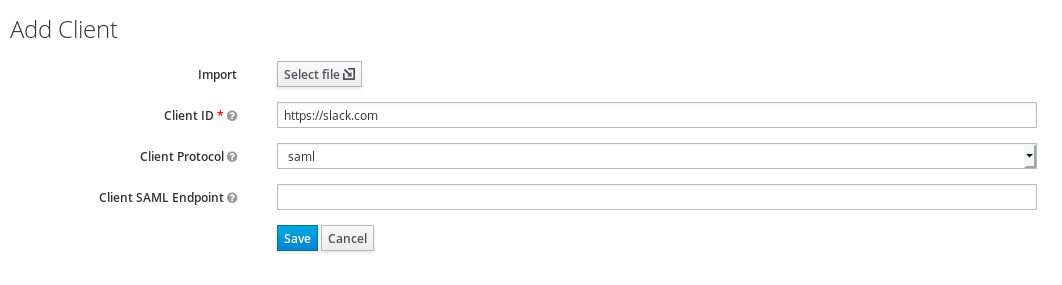
We’re going to go ahead and start making a new client. On the new client screen you’re going to set the Client ID to https://slack.com and set the Client Protocol to SAML. You could in theory set the Client ID to something else, and tell Slack in the settings below, but in keycloak we can override the UI name so it’s better to leave this as is. We do not have a file to import here.
Client Configuration
Now you will need to set several settings to match what Slack will expect.
Set “Include AuthnStatement” to ON
Set “Sign Documents” to ON
Set “Sign Assertions” to ON
Set “Signature Algorithm” to “RSA_SHA1”
Set “SAML Signature Key Name” to “NONE”
Set “Force POST Binding” to ON
Set “Force Name ID Format” to ON
Set “Name ID Format” to persistent
Set “Valid Redirect UIs” to 2 values
- https://[your-slack-url]/
- https://[your-slack-url]/*
Set “Assertion Consumer Service POST Binding URL” to “https://[your-slack-url]/sso/saml”
Set “Logout Service POST Binding URL” to “https://[your-slack-url]/sso/saml/logout”
The value of [your-slack-url] is the actual slack URL for your account, for example homelogin.slack.com
Mapper Configuration
Now that we have the basic configuration out of the way, we will want to go ahead and configure a couple Mappers. Mappers are how Keycloak handles Assertions. We’re going to configure 4 here, but the only one you are required to have is one mapping the email address.
The first thing we’re going to do is actually just grab the built in mappers for these items. They get us most of the way and require very little extra effort.
Click the “Add Builtin” button.
Select “X500 givenName”, “X500 surname”, and “X500 email”. Click Add.
We’re now going to edit a few and make one more.
- Email Address (Required)
- Set “SAML Attribute Name” to “User.Email”
- First Name (Given Name)
- Set “SAML Attribute Name” to “first_name”
- Last Name (Surname)
- Set “SAML Attribute Name” to “last_name”
- Username
- Create a new mapper of type User Property
- Set property to “username”
- Set Friendly Name to “Username”
- Set SAML Attribute Name to “User.Username”
Metadata Download
Once you have completed this we have completed the setup required in Slack, but we need to get some information from Keycloak so we can progress.
Move to the Installation tab and select the Format Option “SAML Metadata IDPSSODescriptor”. This XML document has valuable settings we will need to give to Slack. Download it because we’re about to use it in just a moment.
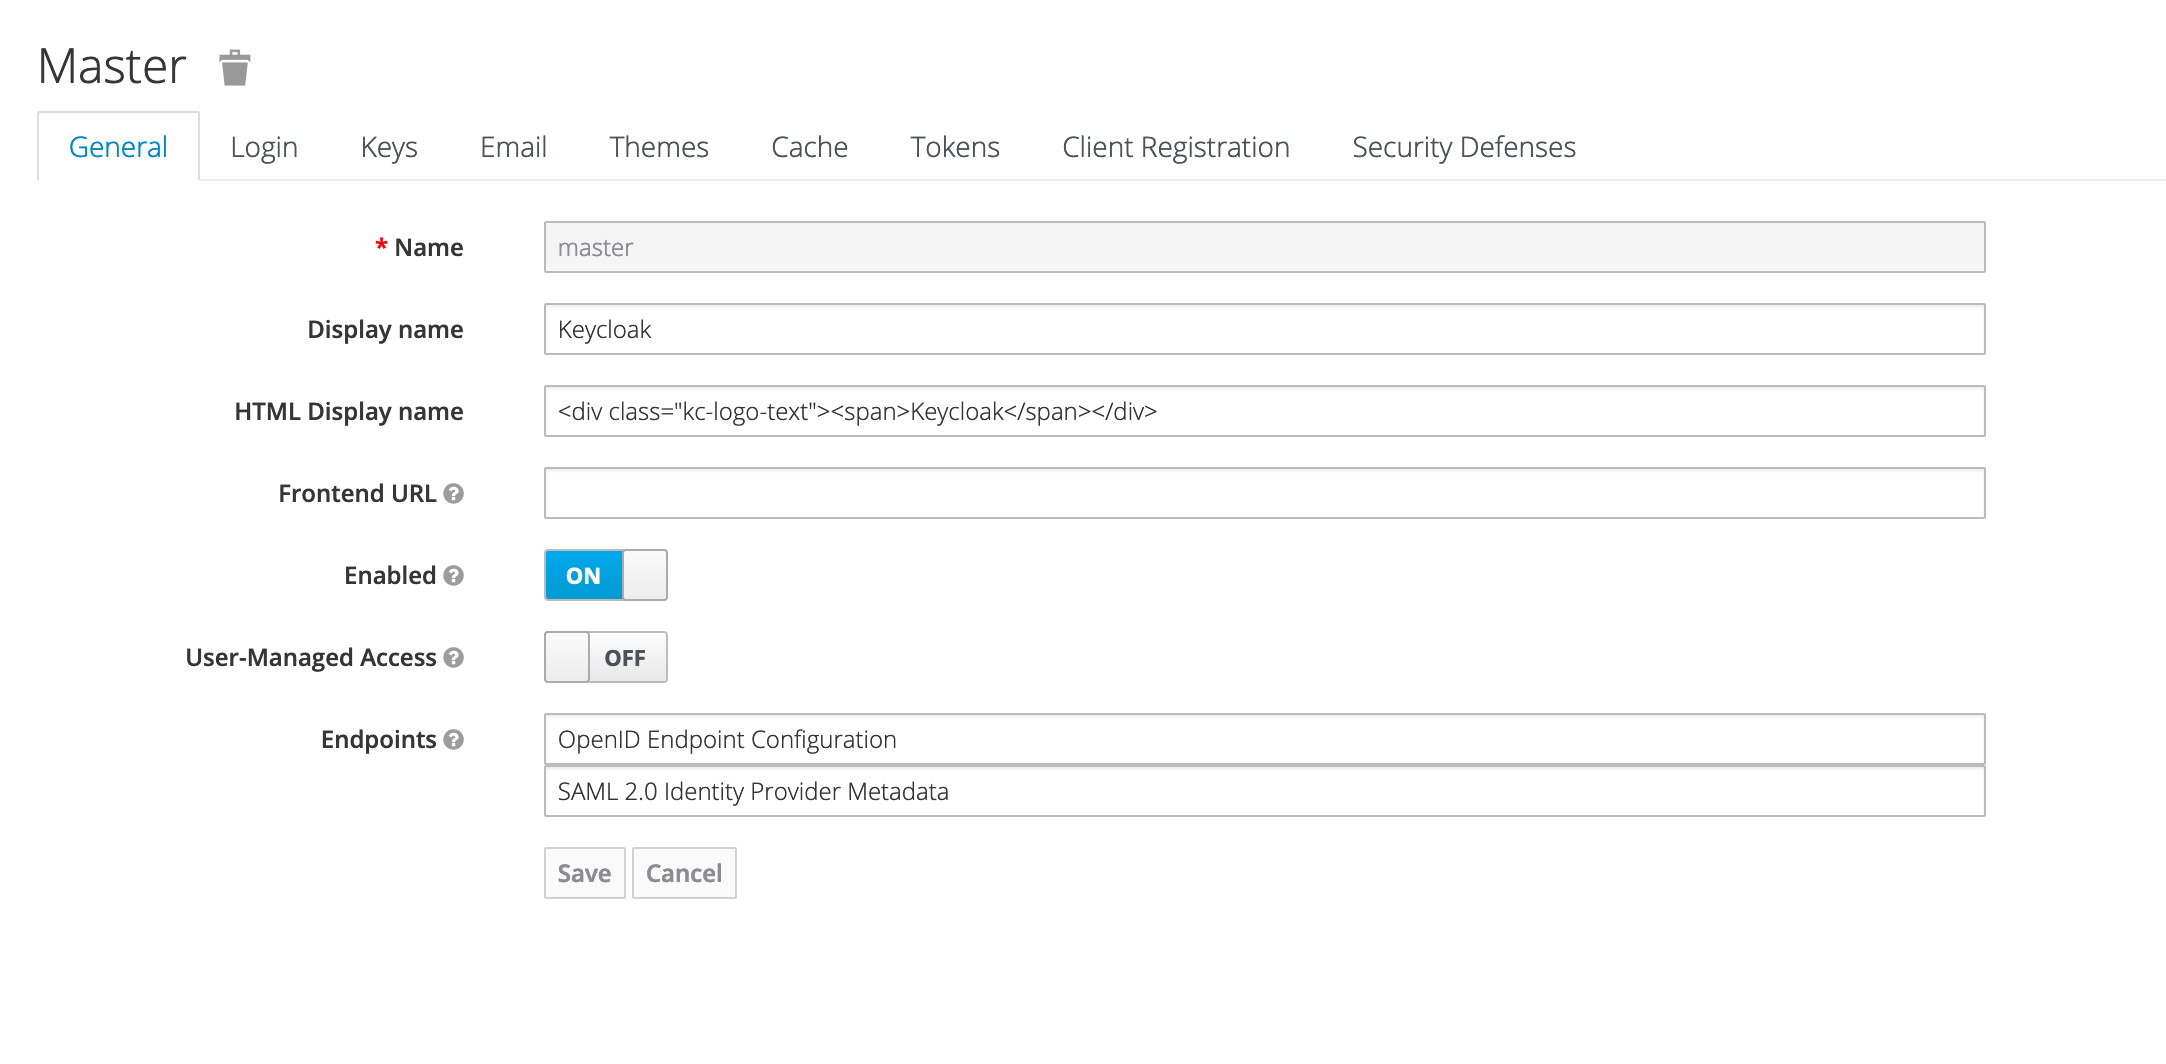
Update 7/30/2020 - In recent Keycloak versions (I don’t know exactly what version this changed in), this metadata document location moved to be an endpoint in the Keycloak UI. You can now find it in the Realm Settings for the realm you’re attempting to add Slack integration to. Look for “SAML 2.0 Identity Provider Metadata”. See screenshot. Your URL should look similar to:
https://[keycloak-location]/auth/realms/[realm]/protocol/saml/descriptor
Download this page as client-tailored-saml-idp-metadata.xml and you should be good to go!
Shout out to @tiagoloriato for pointing out this document needed to be updated.
Slack Installation
Navigate to your Slack Admin panel (https://[your-slack-url]/admin) and go to “Settings and Permissions”
Navigate to the Authentication tab and select the “Turn on SSO” button, this will take you to the SSO configuration screen. You can also now open the “client-tailored-saml-idp-metadata.xml” file we downloaded in the steps above.
Now let’s configure Slack:
Set “SAML 2.0 Endpoint (HTTP)” to “https://[kc-base-url]/auth/realms/[realm-name]/protol/saml” (You can find this in the Location field of the SingleSignOnService property in the metadata)
Set “Identity Provider Issuer” to “https://[kc-base-url]/auth/realms/[realm-name]” (You can find this in the entityID field of the EntityDescriptor property)
Set “Public Certificate” to the X509Certificate in the metadata. You do not need any extra marking, just that striaght value.
Under Advanced Options
- Set “AuthnContextClassRef” to “Don’t send this value”
- Set “Service Provider Issuer” to “https://slack.com”
- Check “Responses Signed”
- Check “Assertions Signed”
Everything else is your preference. I do recommend leaving “Authentication for your workspace must be used by:” to “It’s optional” until you can confirm with a couple accounts it is working. You can now hit “Save Configuration” and if you are not already signed in with Keycloak, Slack will do that now to test the integration.
If your users are already setup in Slack, when they go to sign in with Keycloak, Slack will match them to their email address. Once they are setup though, if the email address changes in Keycloak and you have “Update profile each time a user logs in” checked, it will update in Slack.
IDP Intitiated SSO also works, just set a name in the Keycloak client config and it will begin working. You’re all setup! You can now use SSO to login to Slack. Have fun!